Twist Locking Wiring Devices - AMERICAN DENKI
Expert of wiring devices such as Twist Locking Receptacle and Plug.
Google Custom Search
Product Handling
1 Outlet configurations
Outlets of our wiring devices can be divided into three large groups by configuration.
-

This configuration is used for plugs with blades that form a round shape. After the plug is inserted into receptacle and turned to the right, it is locked and cannot be pulled out. Ideal applications that require secure connections, where pulling out the plug may cause problems.
-

This configuration is used for plugs with straight blades. A common outlet shape, where the plug is inserted into and pulled out in a same direction, making it easy to handle.
-

This configuration is used for receptacles and power strip only. Can be used with straight blade plugs [2P, 3W GND 15A 125V] (our product 7112GN or 7112GR-New). Plug can be locked easily by turning it right after insertion. Clamp locking outlets use simple locking mechanism. If you need secure connection and performance, use twist locking outlets.
2 Built-in procedure of body and housing
Many of our plug and connector body require to mount the body after connection of wires to the wiring and housing. There are two types of housing mounting.
Rubber housing
Insertion type

Insertion type: align the tiny circle dent on the front side of the body with the tiny circle dent on the opening of the housing and insert the body into the housing.
Screw locking type

Screw locking type: align small slits (grooves) on the body with ribs (protrusions) inside the housing and insert the body into the housing. Tighten the lock screws on the front side of the body to fix it.
Nylon housing / Polycarbonate housing
Screw locking type

Align small slit (groove) on the body with rib (protrusion) inside the housing and insert the body into the housing. Tighten the lock screws on the front side of the body to fix it.
3 Wire connection methods
Four wire connection methods are used in our products.
■Appropriate tightening torque of terminal screws (reference values)
| Nominal diameter of terminal screw | M3.5 | M4 | M4.5 | M5 | M6 |
|---|---|---|---|---|---|
| Tightening torque (N・m) | 0.8 | 1.2 | 1.5 | 2.0 | 2.5 |
| Tightening torque (kgf・cm) | 8.1 | 12.2 | 15.3 | 20.4 | 25.5 |
| ++Driver bit type | No.2 | No.3 | |||
We recommend using tightening torques within 80-100% of values in the above table. (The values are according to JIS C 8306)
Crimping terminal type (Ring type)

The most reliable connection method used in many of our products. Attach a crimp terminal (R-type) that conforms to the terminal screw size and wire size, then tighten the screw to fix it.
We recommend R-type crimp terminals. Use crimp tools specified in JIS C9711.
Push-in-screw Terminal type
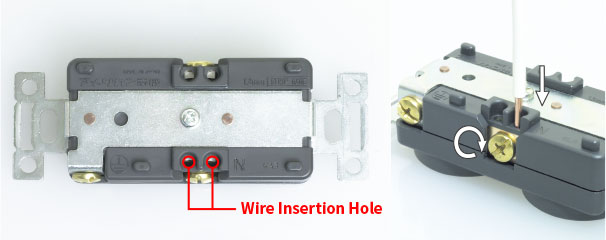
This type of connection is used for products with wire insertion holes near terminals. Strip the insulation from the wire to the required length. Loosen the terminal screw, move the washer inside the device, pass the bare wire through the insertion hole, insert it between internal side of the terminal and metal washer and tighten the terminals screw to fix it.
When using a stranded wire composed of a small number of strands, it rarely becomes deteriorated after insertion due to the wire characteristics. Please remember, that it may cause heat generation or fire. Check tightening of wire connections carefully during work.
Strip gauge indicator

The strip gauge indicator on outlets, plugs and connector body type products is used for stripping insulation from the wire to the proper length when connecting it to the pull-tightening terminals. It is located usually on the back side of outlets and on the side of plugs and connector body type products.
Push-in-screw Terminal type 2
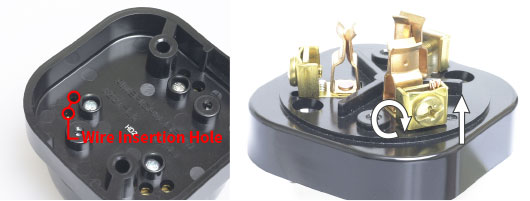
A terminal type often used in our surface receptacles for connection of devices with wire insertion holes on the back side.
Strip the insulation from the wire to the required length. ( the wire tip should be protruded from the bent metal washer) Loosen the terminal screw, move the bent washer from the terminal, pass the bare wire through the insertion hole on the back side, insert it between the terminal and the bent washer and tighten the terminals screw to fix it.
Wire binding terminal type

Strip insulation from the wire and bent the bare wire so that it can wrap around the neck of the terminal screw by 3/4 or more turns. Wrap the bare wire around the neck of the terminal screw and tighten the terminals screw to fix it.
If a product also allows connection using crimp terminal, it is safer to connect the wire to the crimp terminal.
4 Grip (cord stopper) mounting
Our plug and connector body use four main methods for grip (cord stopper) mounting.

Two stripes
After connecting wires to the body and mounting the rubber housing, clip the rubber housing and the cable with two metal grips near the neck of the housing and tighten two screws securely to fix the two stripes.

Resin grip
After connecting wires to the body and mounting the rubber housing, cover the cable between the resin grips and tighten two screws securely to fix the grip.

After connecting wires to the body and mounting the rubber housing, cover the cable opening area with the heat shrinkable tube and clip the cable with two resin grips near the neck of the housing and tighten two screws securely to fix the grip.

Round band
Pass the cord through the grip in advance, connect wires to the body and mount the rubber housing, slide the metal band grip to the neck of the rubber housing and tighten the screw securely to fix it.

Clamp cap
A screw grip with built-in rubber sleeve.
Select one of two types of rubber sleeves according to the cord size. Pass the cord through the grip and rubber sleeve in advance, connect wires to the body and mount the housing, insert the sleeve inside and fix it securely with the grip.
5 Heat shrinkable tube mounting
Heat shrinkable tubes are used to seal cord openings of waterproof plugs and connector body, ensuring waterproof properties.
Mounting procedure
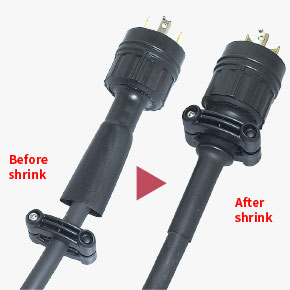
Pass the cable through the grip and heat shrinkable tube in advance, connect wires to the body and mount the housing, cover the cable opening area with the heat shrinkable tube and shrink it using an industrial dryer or similar device, taking care to avoid damaging the cable. The shrinkage temperature of the tube is 130℃, the shrinkage starts from 50 - 60℃ and the tube shrinks to about of 1/2 of the indicated size.
Finally, tighten the grip screw above the heat shrinkable tube to fix it.
6 Bushing tube mounting
Bushing tubes are used when the gap between the inside walls of the cable opening and the cable is too large.
Mounting procedure

Pass the cord through the grip and bushing tube in advance, slide the bushing tube to the gripped section, shrink the tube using an industrial dryer or similar device, taking care to avoid damaging the cord, and mount the rubber cover onto the body with connected wires. The shrinkage temperature of the tube is 130℃, the shrinkage starts from 50 - 60℃.